How to Complete the Sundered Doctrine Dungeon in Destiny 2 – Full Walkthrough

The Sundered Doctrine Destiny 2
The Sundered Doctrine dungeon is the latest endgame activity in Destiny 2, set aboard Rhulk’s ship, the First Disciple of the Witness, deep within Savathûn’s Throne World. This treacherous dungeon requires precise teamwork, quick thinking, and the right loadout to overcome its formidable enemies and intricate mechanics. Below is a full guide to help you navigate each encounter and claim your rewards.

Walkthrough

Opening Encounter
Descend into the lower levels of the ship and enter a large chamber where Ikora’s Guardians are studying ancient artifacts. Keep an eye out for a control panel—it might be important later.
Head to the right, cross a bridge, and approach a sealed door. To progress, jump onto a ledge on the left and find an opening ahead on the right. As you continue forward, you will encounter your first enemies: Dreads and two Subjugators. These are standard enemies and can be easily eliminated with Finishers.
Return of the Vow of the Disciple Symbols
Before the first major fight, you can explore a side passage that leads to a room filled with familiar symbols from the Vow of the Disciple raid. Hovering your crosshair over them will reveal their names—useful if you need a refresher before tackling symbol-related mechanics.

First Encounter – The Lens Puzzle

The starting chamber contains three lenses that project beams of Darkness. Directly ahead, a wall panel displays seven slots for symbols, while four smaller rooms surround the main area.
How to Complete This Encounter:
Activate the Mechanic – Rotate the central lenses to start the puzzle.
Find the Correct Symbol – Defeat the Truthspeaker Major Grim to reveal the required symbol.
Align the Darkness Beam – Direct the beam towards the correct symbol’s circle plate in one of the four rooms.
Use Lenses Wisely – After defeating a Subjugator, pick up a lens and place it in the correct position to extend the beam.
Important Notes:
If the beam is directed at the wrong symbol, a Tormentor will spawn.
Lenses break after three rotations if left connected to the beam.
The first phase requires one beam, the second needs two, and the final phase requires three beams.
Optimal Lens Positions:
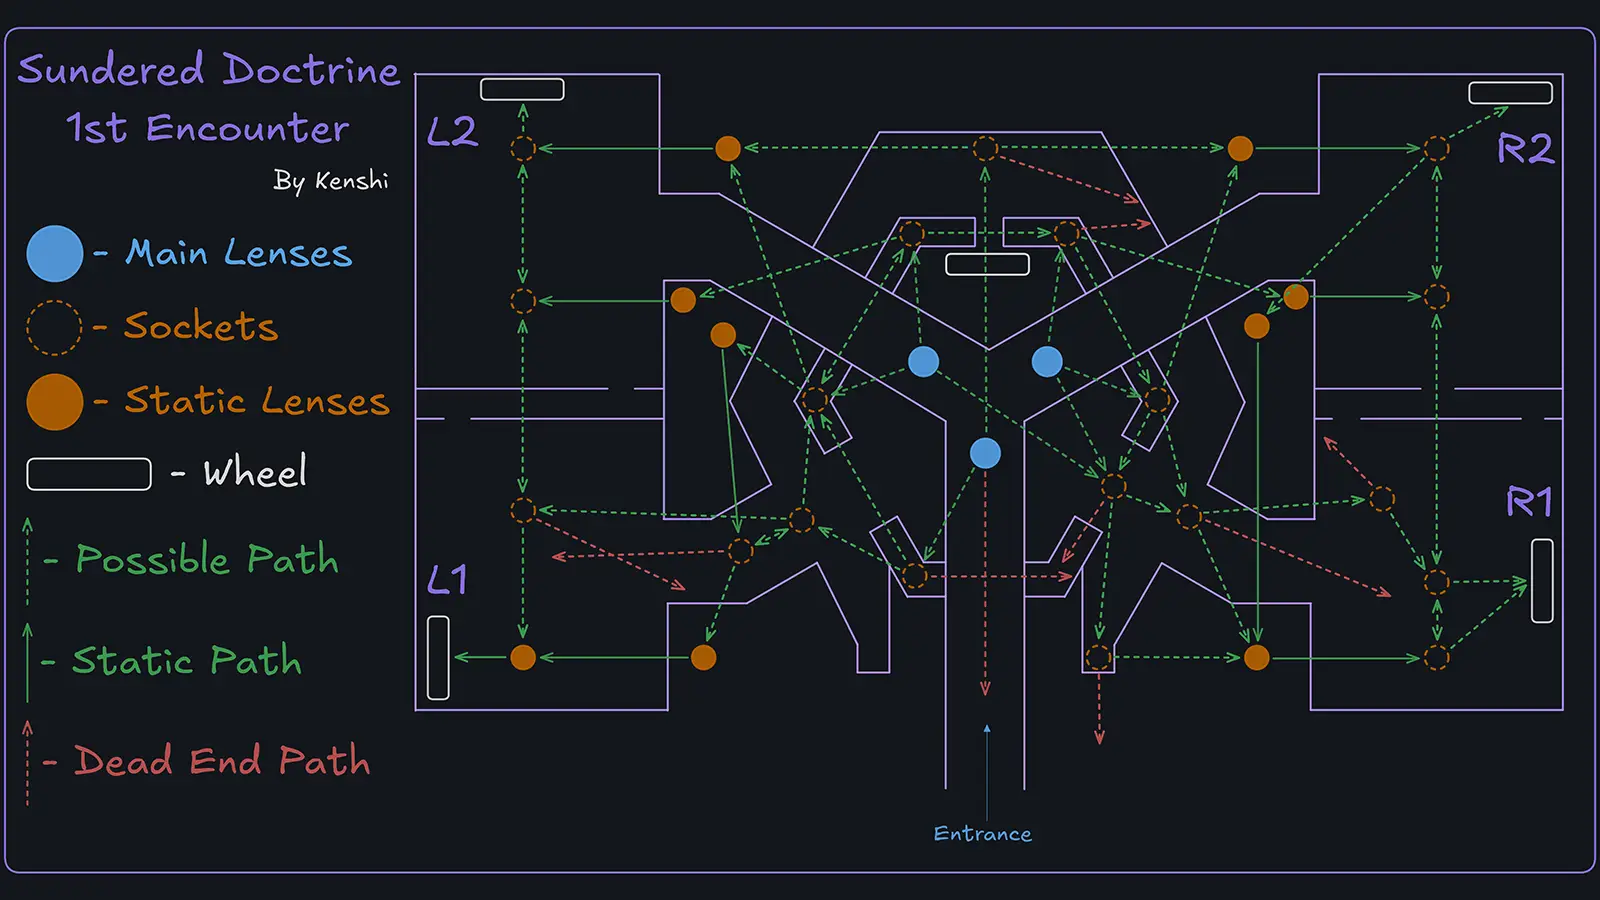
Room 1: Use the left lens, slightly angled left.
Room 2: Use the center lens, aimed straight forward.
Room 3: Use the right lens, slightly aimed between Rooms 3 and 4.
Room 4: Use the left lens, angled to the right.
Second Encounter – Zoetic Lockset

This fight pits you against Zoetic Lockset, a mechanical construct composed of multiple Darkness Shriekers, which fire deadly Resonance Seekers. This battle reintroduces rotating wheels with glowing symbols, requiring strategic positioning.
Mechanics Overview:
Rotating Wheels – Spread across the arena, each wheel has a glowing symbol and a central rotation device.
Resonance Splinters – Dropped by Wizards, these are needed to adjust the wheels.
Buff Levels:
1 Splinter: Heightened Knowledge
2 Splinters: Brimming Knowledge
3 Splinters: Overflowing Knowledge
Shriekers Activate the Wheels – Each symbol triggers different effects:
Hive Symbol – Summons an Ogre.
Brain Symbol – Summons Knights and Wizards.
Stop Symbol – No effect.
Kill Symbol – Starts the DPS Phase.
To initiate the DPS Phase, three wheels must be set to Stop, and one must be set to Kill.
Final Encounter – Kerrev, The Erased

This battle takes place across three rooms: Middle, Left, and Right. The boss, Kerrev, The Erased, stands in the central room before a large circular panel with three symbols on each side.
Step-by-Step Walkthrough:
Identify the False Symbol – One half of the panel presents a true statement, while the other half presents a lie.
Defeat the Truthspeaker Grim – Killing this enemy reveals which symbol is false.
Use Beams to Mark False Symbols – Shine the Darkness beams on the false symbols while avoiding the true ones.
Trigger the DPS Phase – Once the correct symbols are illuminated, activate the center panel.
Important Considerations:

The Obelisk fires a massive beam after the DPS Phase—find cover to survive.
Kerrev frequently suspends players and deals heavy damage, making survivability crucial.
You will need to repeat the mechanic multiple times to defeat the boss.
Recommended Builds & Weapons
Best Subclasses:
Hunters: Celestial Nighthawk (massive burst damage), Gathering Storm (high AoE).
Titans: Storm’s Keep (buffed weapon damage), Thundercrash (high burst damage).
Warlocks: Well of Radiance (team support), Nova Bomb (one-shot DPS potential).
Top Weapon Choices:
Finality’s Auger – Unrivaled DPS against bosses.
Queensbreaker – Provides excellent crowd control.
Bait and Switch Grenade Launchers – High burst potential.
Grand Overture, Thunderlord – Great for sustained damage.
Conclusion
The Sundered Doctrine dungeon is one of the most mechanically demanding and rewarding activities in Destiny 2. With unique puzzles, engaging encounters, and high-tier loot, it provides an excellent challenge for both casual and hardcore players. Mastering the lens mechanics, symbol puzzles, and high-intensity boss fights will ensure a smooth completion and maximize your rewards.
For those seeking an optimized dungeon run, choosing the right subclasses and weapons is crucial. Coordinated team play, effective communication, and understanding each encounter’s mechanics will lead to victory. Whether you're farming for powerful gear, testing your skills, or simply enjoying the lore and atmosphere of the dungeon, "Sundered Doctrine" offers an unforgettable Destiny 2 experience.
Now that you're armed with all the knowledge, gather your fireteam, prepare your loadouts, and take on this dungeon with confidence. Good luck, Guardian! 🚀